Change PowerPoint graphic background is familiar with such issues. Especially when you get a PowerPoint template in the marketplace, you’re not keen on its features. You try to custom its background, change it with your picture, but you can’t. And then, you’re going to complain since it’s explained, ‘All Features Are Editable,’ on that item. However, it’s not the seller’s mistake. So stop whining at such pointless things because, in this article, we’ll show you super-easy tips to change PowerPoint graphic background. PLEASE NOTE: this tutorial is made for PowerPoint 2019.
PowerPoint 2019 often creates presentations with a plain white background. Although this is fine in some cases, you may want to spice up your slide backgrounds, so they look prettier. PowerPoint offers four ways to change the background:
• Solid fill: Creates a solid background-color
• Gradient fill: Creates a background that’s a mix of two colors that gradually fade into one another
• Picture or texture fill: Lets you choose a picture stored on your computer as the background
• Pattern fill: Creates a background pattern of lines or zigzags
How to change PowerPoint graphic background in Slide Master
1. Click the “View” tab
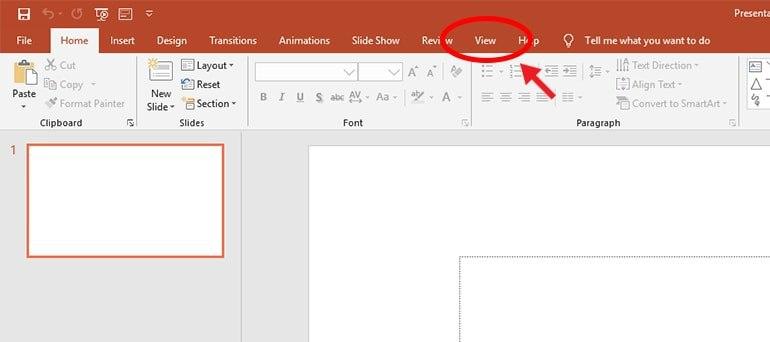
Find the tab already? Just watch closely in-between the “Help” and “Review” tab.
2. Click the “Slide Master” button
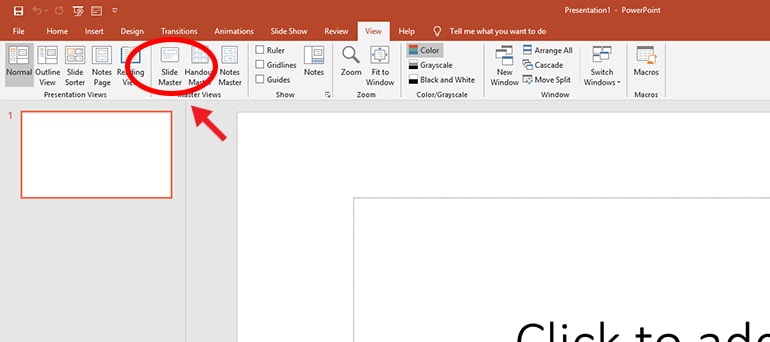
You’re still in the standard view. To change the irreplaceable images, all you need to do is go behind those slides outlook through the “Slide Master” button.
3. Choose the slide you want to edit
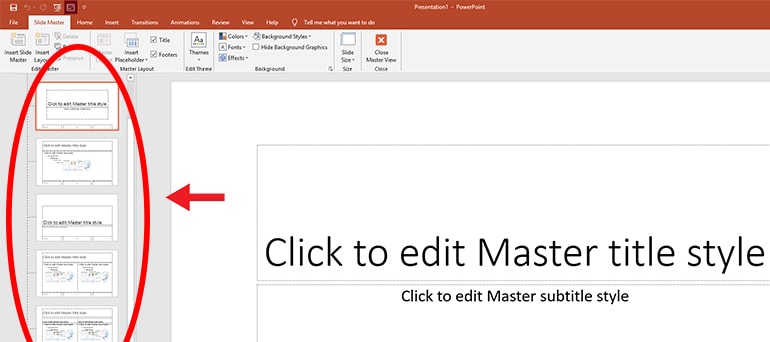
At the left bar, you will see a list of premade slides without contents. Pick which you need to edit. The edit made to that chosen master will apply to a particular slide with an identical layout. Meanwhile, the number 1 slide modification in that listing will apply to all slides in your presentation file.
4. Click the “Background Styles” button
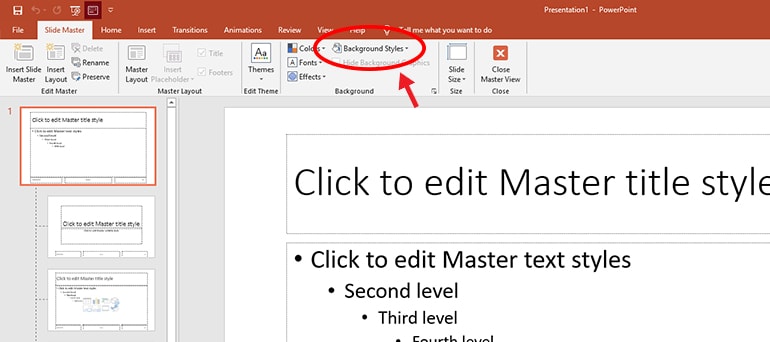
After selecting the slide, now you need to find the “Background Styles” button. Then there you’ll find “Format Background,” which opens another sidebar where you can adjust that slide with more options.
5. Adjust the background
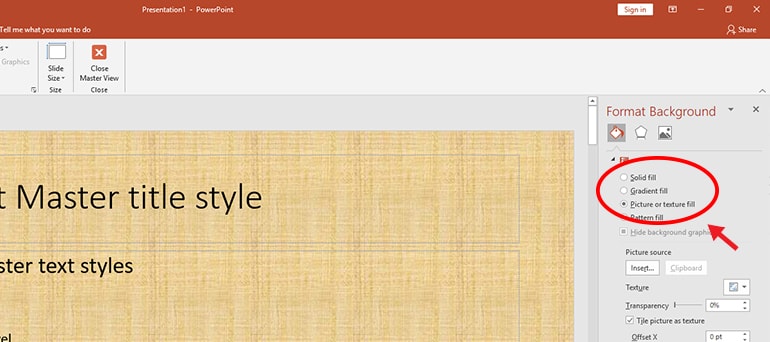
This is a bit technical. There are three dots for you to format the background fill. Each option can be useful depends on your need. You can do graduating, texturing, making cool patterns, and whatsoever. In that sidebar, there’s also an option to give artistic effects (look at that pentagonal button). Take your time for editing. After all, you need to click the “Close Master View” button and back to the normal one.
Choosing a solid color background in PowerPoint 2019
Solid colors can contrast your slides, but you have to make sure that any text or graphics that appear on your slides can still be seen. For example, if you choose a dark red background, any text or graphics on your slides should appear in light colors.
To make sure that solid background colors don’t obscure your text and graphics, you can also adjust the background transparency to make the color appear darker or lighter. To change the background to a solid color, follow these steps:
1. Click the Design tab.
Remember: If you click a slide in the thumbnail view and hold down the Ctrl key, you can select which slides you’ll change. If you don’t select any slide, PowerPoint will change all your slides.
2. In the Customize group, click the Format Background icon. The Format Background pane appears.
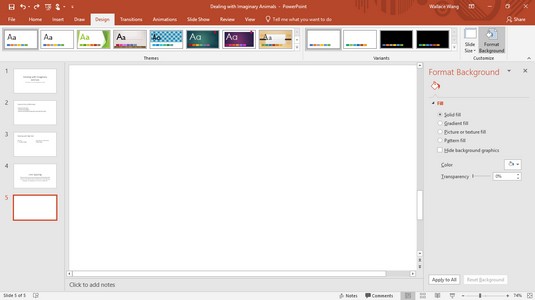
3. Select the Solid Fill radio button.
4. Click the Color icon. A pull-down menu appears, listing a palette of colors.
5. Click a color. PowerPoint fills your slide background with your chosen color.
6. (Optional) To change the transparency of the color, drag the Transparency slider left (0%) or right (100%). The higher the transparency value, the lighter the background color appears.
7. (Optional) To change the background of every slide in your presentation, click Apply to All. If you don’t click the Apply to All button, PowerPoint changes only the background of the currently selected slide.
Tip: If you click the Reset Background button, you can remove any background changes you made.
8. In the Format Background pane, click the Close (X) icon.
Choosing a gradient background in PowerPoint 2019
A gradient displays one color that gradually fades into another color, such as green to orange. To define a gradient, you specify one or more stops, the transparency, and the gradient direction. Stops define where the colors in the gradient start and end. Transparency explains how opaque a color appears. The gradient direction determines how the gradient seems, such as vertically or diagonally.
To define a gradient background, follow these steps:
1. Click the Design tab.
Remember: If you click a slide in the thumbnail view and hold down the Ctrl key, you can select which slides you’ll change. If you don’t select any slide, PowerPoint will change all your slides.
2. In the Customize group, click the Format Background icon. The Format Background pane appears.
3. Select the Gradient Fill radio button. The Format Background pane displays additional options for defining a gradient.
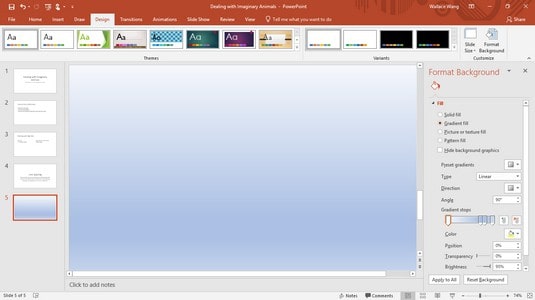
4. Click in the Type list box and choose an option, such as Linear or Rectangular.
5. Click in the Direction list box and choose a direction for the gradient.
6. In the Angle box, click the up or down arrow to increase the angle or decrease the angle, respectively.
7. Drag the Gradient Stops sliders left or right. The far-left and far-right positions of the stop-position slider define where the gradient begins and ends on the slide.
8. Click the Color icon, and then click a color in the palette that appears. PowerPoint displays your chosen color as a gradient on the current slide.
9. In the Position text box, click the up or down arrow to change the position of the gradients.
10. Drag the Transparency slider left or right. The far-left position (0%) displays your chosen color in full strength, and the far-right position (100%) shows your selected color to the point where it disappears from view completely (100% transparency).
11. (Optional) To apply your gradient to every slide in your presentation, click Apply to All. If you don’t click the Apply to All button, PowerPoint displays only the background of the currently selected slide.
12. In the Format Background pane, click the Close (X) icon.
Choosing a picture background in PowerPoint 2019
A picture, such as clip art or a photograph captured with a digital camera, can appear in your background. After you use an image for the background, you can adjust its transparency so that you can read any title or subtitle text on each slide.
To add a picture background to slides, follow these steps:
1. Click the Design tab.
2. In the Customize group, click the Format Background icon. The Format Background pane appears.
3. Select the Picture or Texture Fill radio button. The Format Background pane displays options for adding a picture to your background.
4. Click one of the following buttons:
• File: Retrieves a graphic image stored on your computer, such as a digital photo. When the Insert Picture dialog box appears, click the picture you want to use and then click Open.
• Clipboard: Pastes a previously cut or copied graphic image from another program, such as Photoshop.
• Online: Displays a library of clip-art images you can choose. Type a description of the picture you want. When clip-art images appear, click the one you want to use, and then click Insert.
5. Drag the Transparency slider to the left or right until you’re happy with the way the picture appears.
6. To change the position of your picture, click the up or down arrow of the Offset left, right, top, or bottom text box.
7. To apply your picture to every slide in your presentation, click Apply to All if you want. If you don’t click the Apply to All button, PowerPoint displays only the background of the currently selected slide.
8. In the Format Background pane, click the Close (X) icon.
Choosing a pattern background in PowerPoint 2019
A patterned background can display lines, dots, or other types of repeatable patterns in the background of your slides. Patterns give you one more way to enhance the visual appearance of a slide.
To add a pattern background to slides, follow these steps:
1. Click the Design tab.
2. In the Customize group, click the Format Background icon. The Format Background pane appears.
3. Select the Pattern Fill radio button. The Format Background pane displays options for adding a pattern to your background.
4. Click one of the available patterns.
5. Click the Foreground icon. A color palette appears. The color you choose determines the color of the pattern of lines or dots you chose in Step 4.
6. Click the Background icon. A color palette appears. The color you choose determines the color of the pattern background you chose in Step 4.
7. To apply your picture to every slide in your presentation, click Apply to All if you want. If you don’t click the Apply to All button, PowerPoint displays only the background of the currently selected slide.
8. In the Format Background pane, click the Close (X) icon.
See also:
Add Background Graphics in PowerPoint
20+ Awe-inspiring Icon Sites for Presentation Design
Quick and straightforward, huh?
Change PowerPoint graphic background is one of these software surprises many people don’t know. If you want to get a cool pitch deck, you can jump to our market right away. We provide premade slides that can be used widely depends on your field of work. Our products are guaranteed with updates, and all of our features are easy to edit. You need no expert skills to get the best visual looks to persuade your audience. Do you have any other PowerPoint issues? Drop in the comment, and we’ll show you how to fix it!
Let’s visit RRPicks to download free PowerPoint presentation templates with many categories. But wait, don’t go anywhere and stay here with our Blog to keep up-to-date on all the best pitch deck template collections and design advice from our PowerPoint experts yet to come!


